 |
|
Bios
Dr. Van der Merwe is a vitreoretinal surgery fellow at the University of Toronto. Dr. Felfeli is an ophthalmology resident at the University of Toronto. Drs. Rice and Steffen are consultant ophthalmologists at the University of Cape Town, South Africa. Dr. Mandelcorn is an associate professor of ophthalmology at the University of Toronto. DISCLOSURES: The authors have no relevant financial relationships to disclose. |
North of the border, we often have no choice but to be frugal when it comes to managing health-care costs. Here, we would like to share six of our favorite simple, safe and cost-saving ideas for common retina procedures and imaging techniques along with accompanying videos.
1. Scleral depression with a naked light pipe
 |
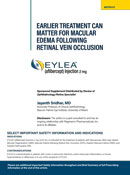
| Figure 1. In scleral depression using a naked light pipe, the transilluminated scleral depressor provides enough internal light for safe vitrectomy and vitreous base shaving. |
The ability to visualize and work in the region of the vitreous base is an integral step of many vitreoretinal procedures. We typically do this by either depressing the sclera under chandelier illumination or having a surgical assistant perform the scleral depression.1
Recently, the use of lighted scleral depressors has become more commonplace. Many companies have produced guards that are placed over the light pipe, giving it properties that facilitate scleral depression. While using a smooth sleeve over the light pipe reportedly minimizes conjunctival trauma, we’ve found this step to be unnecessary and prohibitive from a cost-of-access perspective.
We reported on the use of a naked light pipe for transscleral depression,2 in which the shaft of an unguarded light pipe is placed parallel to the scleral surface until the end of the light pipe is over the area of interest (Figure 1). The light pipe shaft is then turned more perpendicular and depressed until the peripheral retina comes into view.
Subtle adjustment of the orientation of the light source may then highlight the anterior vitreous or retinal plane. This technique allows the surgeon to operate independently with maximum control.
We find this technique particularly useful for removing residual inferior vitreous hemorrhage or small residual particles of dislocated cataract that can be caught in the vitreous base. They’re are very nicely visualized with transscleral illumination.
2. Laser-light-assisted retinal membrane delamination
 |
| Figure 2. In laser-light-assisted retinal membrane delamination, the blunt curved end makes a perfect fit along the retinal surface and provides good visibility of the tissue plane. |
Retinal membrane delamination is the process of separating adhesions between membranes and the retina.
In our experience, the lighted curved laser probe has two properties that make it ideal for membrane delamination (Figure 2). First, its curvature, similar to the viscodissection cannula, as Jorge Fortun, MD, and Baker Hubbard 3rd, MD, reported,3 allows the orientation of the probe to be parallel with the retinal surface.
This results in less traumatic blunt dissection when pulling on membranes with forceps. Secondly, the light source allows for direct visualization of the membrane and retinal interface and may allow the surgeon to perform bimanual membrane manipulation without a chandelier.
Despite the usefulness of the lighted curved laser probe, it’s important to note that when working so close to the retinal surface the lighting will be very intense in the immediate area, while visualization and illumination of the adjacent structures may be less clear. Be cautious when using the probe to perform blunt dissection to membranes very tightly attached to the retinal surface; this can lead to iatrogenic tears.4
The fact that the illuminated laser probe is often opened and paid for anyway in diabetic vitrectomy cases for the endoretinal laser portion of the surgery is another reason why it’s one of our frugal faves.
3. A simple, passive backflush cutter
 |
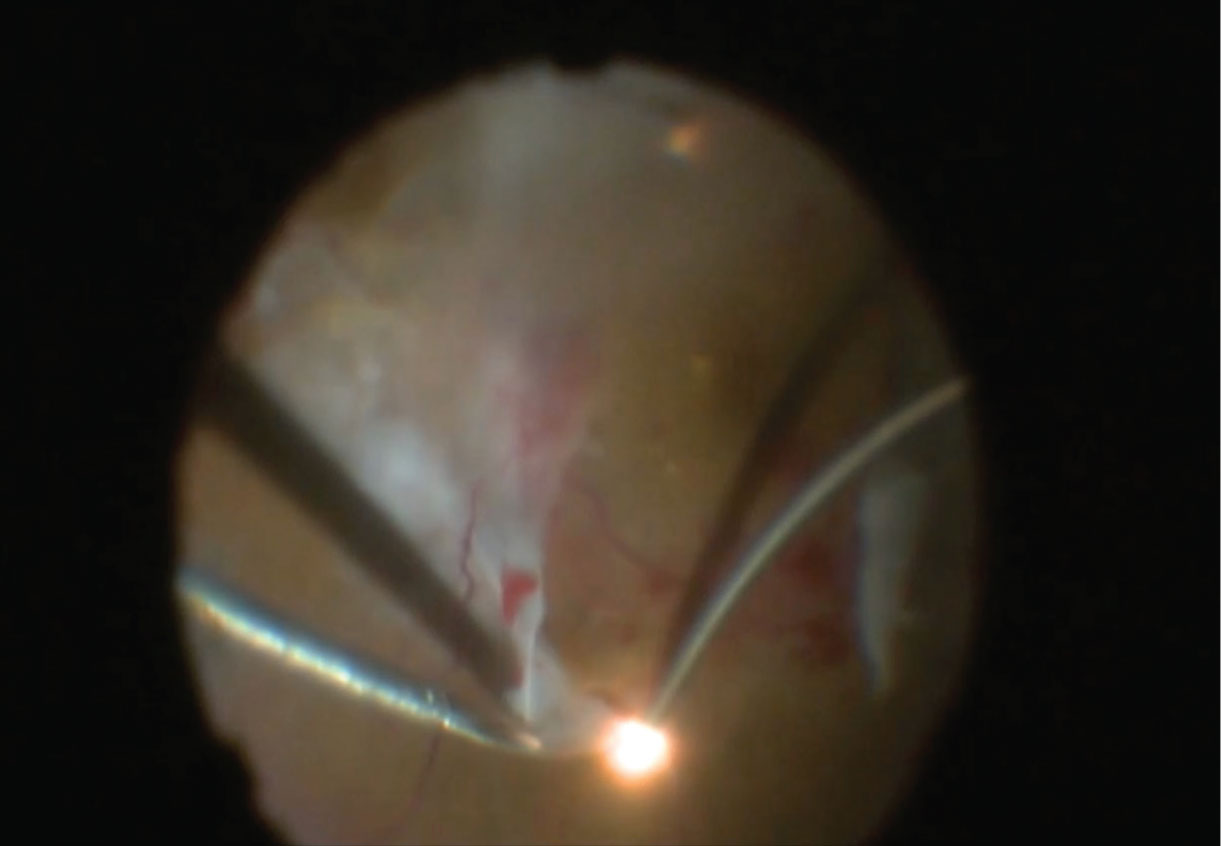
| Figure 3. In the final stages of the fluid-air exchange, opening the connection for the standard vitreous cutter can create a passive extruding instrument to help remove residual fluid from the posterior pole or the retinal break edge. |
Draining subretinal or vitreous fluid can be achieved using both active and passive extrusion. Active extrusion could be done with the vitreous cutter or a backflush cannula, but passive extrusion was only for the backflush cannula—until now.
By simply opening the connection for the standard vitreous cutter you can create a passive extruding instrument that can help remove small amounts of residual fluid from the posterior pole or the edge of a retinal break in the final stages of the fluid-air exchange (Figure 3).
4. Slit-lamp smartphone photography
Several approaches to smartphone anterior segment photography that involve purchasing an adapter to attach to the slit-lamp have been described in the literature.5 Given the frequent updates in sizes and shapes of smartphones, here we describe our step-wise approach for capturing high-quality images without the need for an adapter:
 |
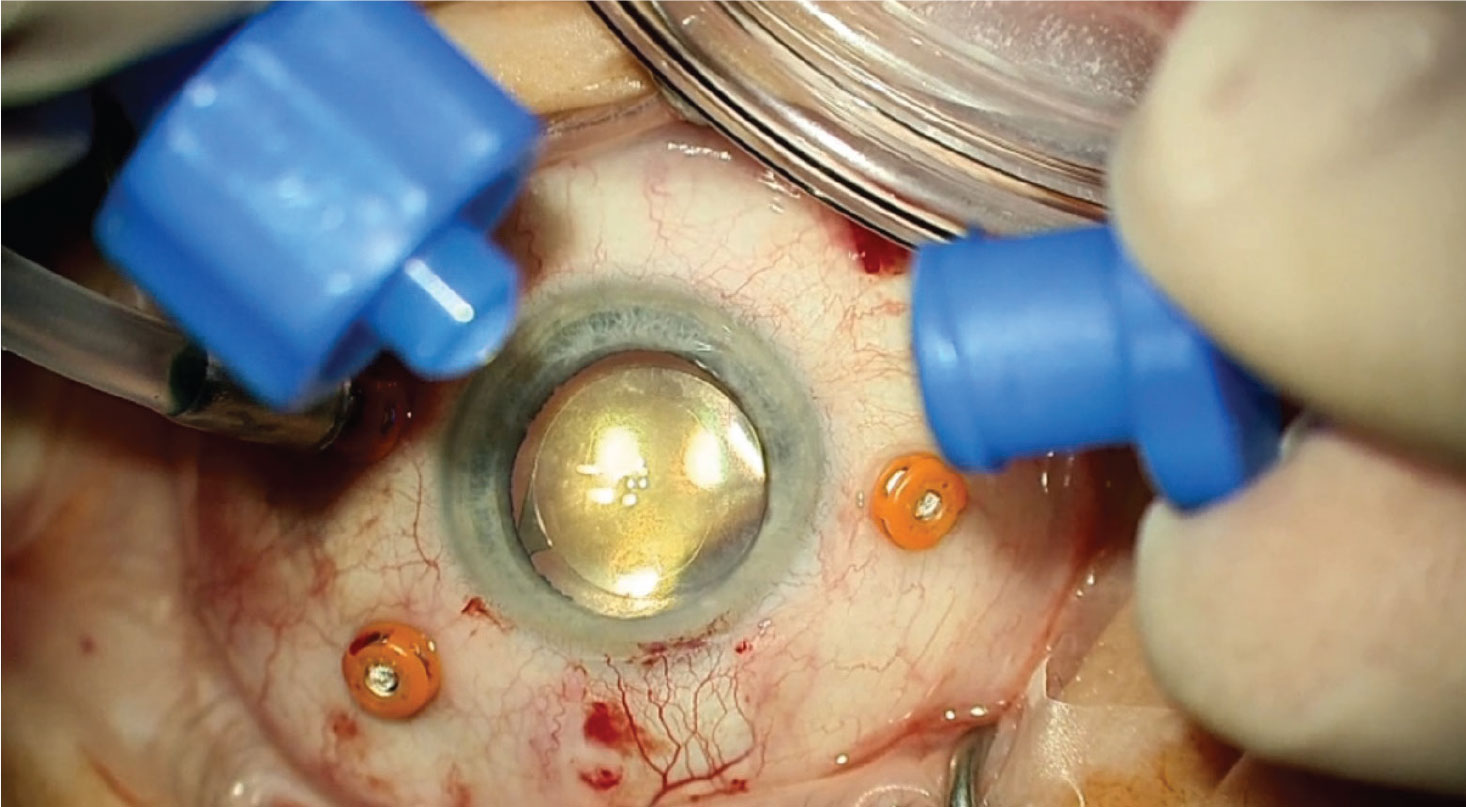
| Figure 4. If your slit lamp has an integrated diffuser (A, B), you won’t need to purchase an additional light source. Support your hand over the top of the oculars (C) and then grip the phone between your index finger and palm (D). |
Illumination. This should be diffuse, using either the slit-lamp or an indirect, diffuse light coming from the side. Check to see if your slit lamp has an integrated diffuser. If so, you won’t need to purchase an additional light (Figures 4A, B).
Camera settings. Have the flash turned off.
Focus. Bring the slit-lamp into focus on the anterior segment as you usually do.
Stabilize the camera. Instead of using a fancy smartphone-holding device, support your hand over the top of the oculars and then grip the phone between your index finger and palm (Figures 4C, D). This is the key.
Focus and center the image. Move the phone closer or farther away from the slit lamp to find the appropriate focal distance for your phone. The appropriate focal distance is found when the circular image on your screen is entirely filled and in focus. Remember to focus the slit lamp before you focus the image on your phone. Move the phone up and down, left and right, and rotate it on the long and short axes to center the image on your screen.
Take the picture. With your free hand, tap the screen to take the picture.
5. Cheap, assistant-controlled directional chandelier
Chandelier endoillumination has become common everyday practice for most vitreoretinal surgeons, but these devices are costly and can’t be controlled to minimize glare and direct the light where it’s needed. Our solution for this is the “assistant-controlled directional chandelier.” Here’s what you’ll need:
- a light pipe, standard on all PPV sets;
- male Luer connector (cheap or standard on most cataract PPV trays);
- Op Site/adhesive dressing/label to fixate tubing to the operative field;
- a snap, also standard on the PPV tray; and
- an assistant sitting to your right (usually with an excited and generally confused facial expression; standard at most training hospitals).
Stick the Luer connector to the light pipe with adhesive dressing, leaving about 6 mm of residual light pipe exposed. This stops the assistant from inadvertently advancing the light pipe too deeply into the eye. Create a handle with the label folded around the light pipe and a snap gripping the label only. From here the assistant can hold and point the light source in the direction of your choosing without getting in your way.
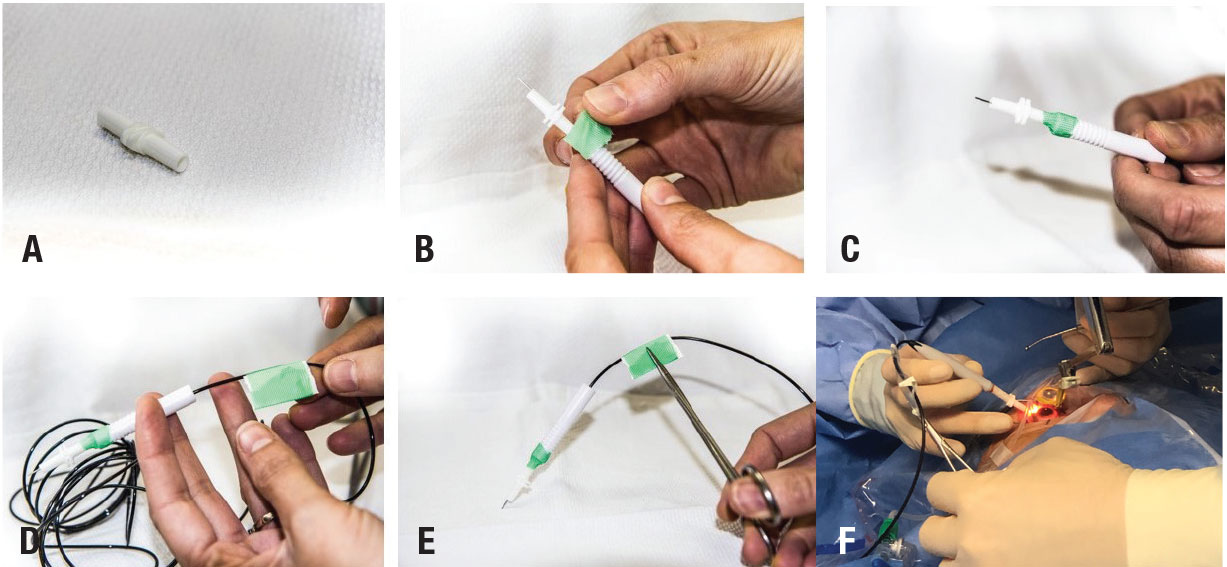 |
| Figure 5. The male Luer connector (A) is attached to the light pipe label/ adhesive dressing (B) to create a secure connection (C). To create the handle for the chandelier, fold the label/adhesive dressing on itself and around the optical fiber (D). This allows grasping of the chandelier (E) without crimping the optical fiber, which would damage it. The completed chandelier (F) can be held by the assistant without disrupting the surgeon’s hands. |
This technique has several advantages. It allows for bimanual dissection. It provides bright, directional light that’s sometimes lacking with other chandeliers. It’s voice-controlled (grunt in the general direction of the fellow). It’s reversible; once you’re done, remove the Luer connector and continue with the light pipe as before. And it’s free.
6. Low-cost retinal surgery simulator
Surgical simulation training provides a low-stress environment in which to acquire and evaluate your skills. A recent systematic review concluded that vitreoretinal simulators are a useful assessment tool and may be able to teach the complex techniques required for vitreoretinal surgery.6
The latest retinal surgical simulators could run into the hundreds of thousands of dollars. Here, we share our experience with a low-cost retinal simulator that was developed at the University of Cape Town by co-author Dr. Rice and colleagues.7
Although the model doesn’t teach specific procedures, it does provide a realistic surgical environment for the trainee to explore and use real retinal instruments and learn fine motor control. It’s been found to be especially useful for learning navigation and orientation with the indirect viewing system.
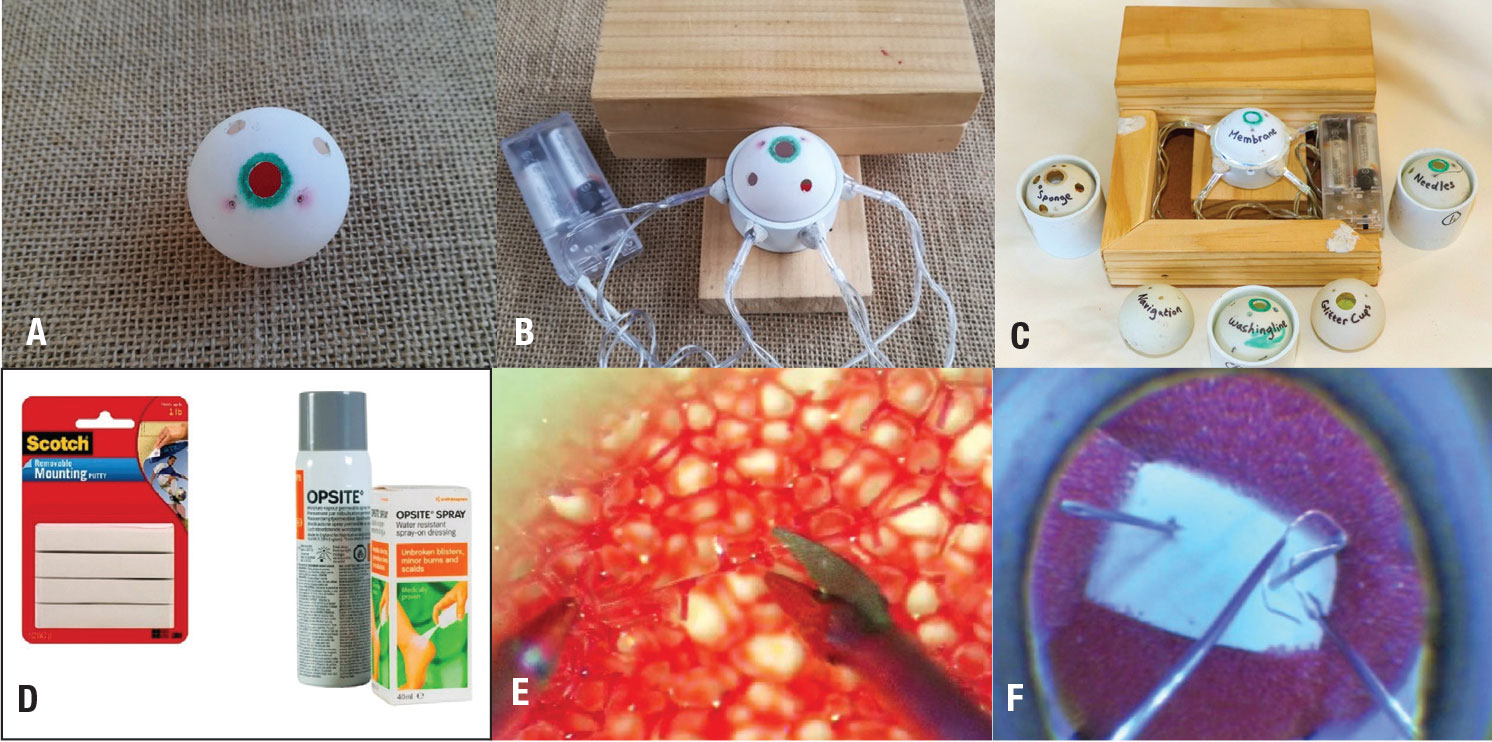 |
| Figure 6. The low-cost retinal simulator consists of (A) the training “eye,” (B) the completed simulator model without hardboard base and (C) with the hardboard base and examples of training eyes. The tools used in construction of training eyes (D) include reuseable adhesive putty (Scotch mounting putty) and spray-on membrane dressing (Op Site spray) to create membranes for dissection. Exercise tasks include (E) bimanual sponge dissection and (F) bimanual threading of an electrical wire loop through the eye of a needle. |
 |
The model can be constructed in a few hours for less than $20 U.S. A full description of how to construct and use the model has been published online (Figures 6A to C).8
Tasks, including membrane peeling, can be mimicked by using Op-Site spray for unimanual and bimanual dissection practice. After spraying a thin layer of Op Site, you can color the membrane with a felt-tipped pen to create the impression of a stain. The membrane can be gently scored with a razor blade to create strips for peeling, or left unscored for bimanual tasks (Figures 6D to F).
Other tasks include threading a wire through the eye of a needle. For this exercise, fixate a pencil eraser with two sewing needles impaled into it to the bottom of the eye. A thin copper wire can then be threaded through the eyes of the needles as a one or two-handed exercise. Other advantages of this simulator include ease of accessibility and portability, which could serve well for residents and fellows as a warm-up before the start of a surgery day. RS
Link to the online description here.
REFERENCES
1. Peyman GA et al. A new wide-angle endoillumination probe for use during vitrectomy. Retina 2002;22:242.
2. E Mandelcorn et al. Unassisted scleral depression during vitrectomy surgery: Two simple, cost-effective techniques. Ophthalmic Surg Lasers Imaging Retina. 2015;46:577-578.
3. Jorge A Fortun, G Baker Hubbard 3rd. New viscodissection instrument for use with microincisional vitrectomy in the treatment of diabetic tractional retinal detachments. Arch Ophthalmol. 2011;129:352-355.
4. Iyer SSR, Regan KA, Burnham JM, Chen CJ. Surgical management of diabetic tractional retinal detachments. Surv Ophthalmol. 2019;64:780-809. [this reference isn’t cited in 2nd fave]
5. Hester CC, Feldman BH. Smartphone phoneography – How to take slit lamp photographs with an iPhone. American Academy of Ophthalmology Eyewiki. Updated September 10, 2020. https://eyewiki.aao.org/Smart_Phoneography_-_How_to_take_slit_lamp_photographs_with_an_iPhone Accessed March 15, 2021.
6. Rasmussen RC, Grauslund J, Vergmann AS. Simulation training in vitreoretinal surgery: a systematic review. BMC Ophthalmol. 2019;19:90. doi: 10.1186/s12886-019-1098-x.
7. Rice JC, Steffen J, du Toit L. Simulation training in vitreoretinal surgery: A low-cost, medium-fidelity model. Retina. 2017;37:409-412.
8. Rice JC. Making a los-cost retinal surgical simulator. Community Eye Health. 2019;32:34–35.