 |
Pneumatic retinopexy involves injection of a gas bubble into the vitreous cavity and application of retinopexy to causative retinal breaks. In the last issue, we discussed in this space the rationale, design and findings of the PIVOT study, a randomized controlled trial that compared pneumatic retinopexy and pars plana vitrectomy.1 Here, we provide some tips and tricks that may help optimize anatomical re-attachment rates when performing pneumatic retinopexy.
Steps before pneumatic retinopexy
Prior to injecting the gas in pneumatic retinopexy, it’s essential to carefully examine the peripheral retina with indirect ophthalmoscopy and 360-degree scleral indentation to visualize all pathology. We recommend pretreating any lattice degeneration or breaks in attached retina with laser retinopexy because this offers swift adhesion compared to cryopexy.
In cases with small peripheral breaks in the detached retina, which may be difficult to visualize after gas injection, cryopexy before pneumatic retinopexy can be helpful. This step may aid in operating on aphakic patients or those with anterior chamber/iris clip lenses that make break visualization onerous through gas.
In some cases we’ve found that marking the edge of the retinal break itself with laser (a challenging task in its own right) or, alternatively, marking the ora serrata in the meridian of the retinal break will assist with identification and treatment of the break with laser retinopexy once the retina has reattached.2
 |
Optimizing the tamponade
It’s crucial to maximize the size of the injected gas bubble. We believe this is an important factor in determining the likelihood of anatomical success. The ideal gas for use in pneumatic retinopexy will expand quickly to facilitate prompt retinal reattachment and laser, followed by quick resorption. We prefer pure SF-6 gas because it expands over 48 hours and lasts 12 days.
We recommend injecting 0.3 cc of pure SF-6 greater than the anterior chamber tap volume, and rarely less than 0.6 cc. For example, if 0.8 cc can be removed from the anterior chamber, then 1.1 cc of pure SF-6 gas can be injected. In order to maximize the volume of the anterior chamber tap, we like to perform the procedure with the patient supine.
A 30-gauge needle on a 1-cc syringe with the plunger removed is inserted temporally, and is passed obliquely over the iris in phakic patients and radially in pseudophakes. We place the plunger behind the limbus opposite the needle entry site to create a dome over the needle tip. Applying constant and firm pressure with the plunger encourages expression of aqueous and liquefied vitreous.
When a larger gas bubble is needed
In cases that require a gas bubble that’s larger than what can be injected in a single sitting, we recommend sequential gas bubble injections. This is preplanned in some cases, and done emergently in others depending on how the case evolves. In both scenarios, sequential gas bubble injection has helped to increase retinal reattachment rates with pneumatic retinopexy.
When injecting the gas bubble, it’s ideal to minimize the occurrence of “fish eggs” and achieve a single large bubble. We use a 3-cc syringe with a 30-ga. needle for gas injection, selecting an injection site at the highest point of the globe. The superotemporal quadrant is ideal, unless a gaping break at that location presents a risk of subretinal gas passage.
To inject the gas bubble, we advance the needle into the vitreous cavity approximately half of the way in, and then pull back so the tip is barely in. We then inject the gas in a steady and swift manner. This allows it to be injected into a single expanding bubble.
After the injection, we examine the posterior segment to assess for central retinal artery perfusion and perform an additional AC tap if the artery is occluded. If the artery is pulsatile, the surgeon can safely wait for a few minutes to see if it becomes non-pulsatile. If the patient is unduly uncomfortable, then a repeat AC tap is advisable.
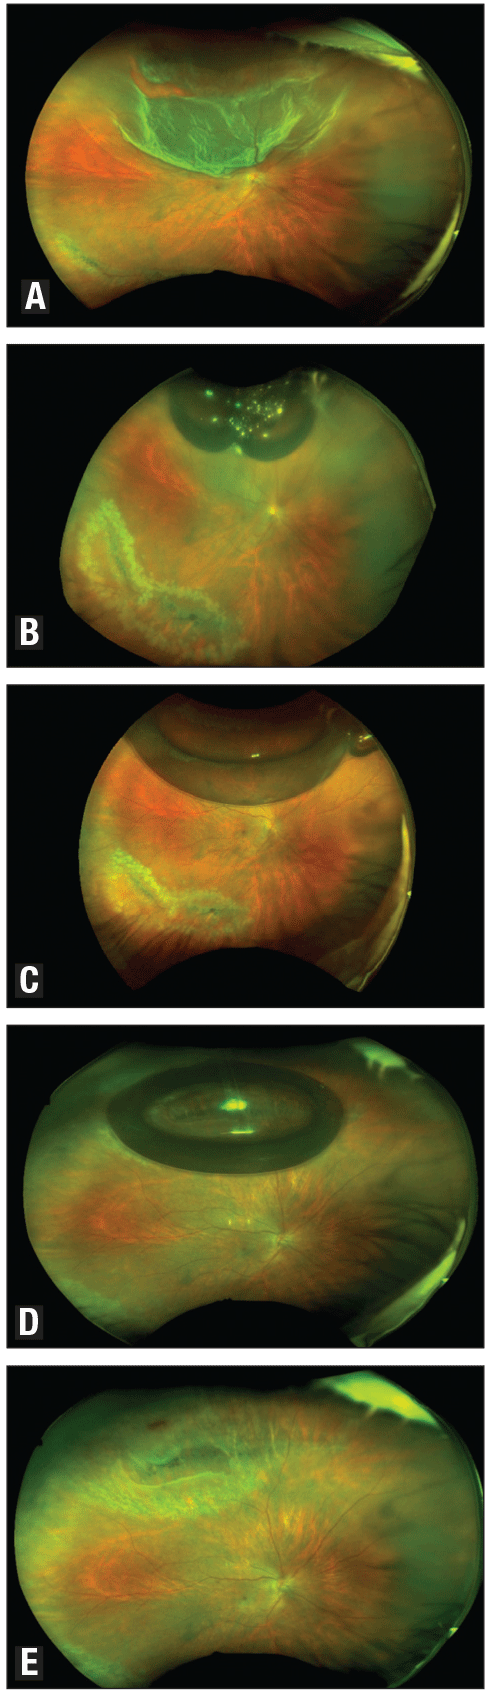 |
| Wide-field retinal images demonstrate outcomes of a phakic patient meeting PIVOT criteria. With a superior macula-off retinal detachment (A), the patient underwent laser retinopexy for inferior lattice pre-pneumatic retinopexy. At two hours post-pneumatic retinopexy with patient positioning face down, significantly less fluid is seen and some fluid is displaced nasally (B). At 15 hours post-pneumatic retinopexy, the retina is fully attached with coalesced bubbles (C). The patient underwent laser for a superior break 48 hours post-pneumatic retinopexy, demonstrating fully attached retina and superior break lasered (D). At 10 days post-pneumatic retinopexy, following reabsorption of the gas bubble (E), the retina is fully attached with all |
Post-injection steps
Diligent postoperative positioning is critical for success with pneumatic retinopexy. Patients are generally advised to position face down for four hours in macula-on cases and for six hours in macula-off cases to protect or preferentially reattach the macula, then slowly steamroll to the final desired position. For example, in a superior bullous detachment, the patient would raise her or his head by 30 degrees every hour until reaching the head elevated position.
We advise patients to maintain the desired position for one week. In cases with inferior breaks in the attached retina, steamrolling is performed in a specific manner to encourage subretinal fluid to displace away from the inferior break. For an inferotemporal break in the attached retina, steamrolling with a left head tilt will encourage displacement of fluid superiorly and away from the inferior break.
We believe that one intrinsic advantage of pneumatic retinopexy is that it induces the retinal pigment endothelial “pump” to resorb the subretinal fluid naturally rather than using forced drainage as with pars plana vitrectomy. In many cases, once the gas bubble fully covers the retinal break, the subretinal fluid can resorb rapidly within hours (Figure, at right).
Days later, indirect laser retinopexy
In the days following the pneumatic retinopexy, indirect laser retinopexy is applied around the retinal break and sometimes to adjacent areas that are suspicious. We encourage generous laser retinopexy. However, take care not to apply excessively heavy laser to areas where subretinal fluid remains.
Subconjunctival anesthesia can assist in performing laser retinopexy after
pneumatic retinopexy in certain cases. Laser retinopexy can be challenging with a gas bubble present. Modifying the head position during the laser procedure helps to provide a view fully through the gas bubble or to divert the gas out of the way. In pseudophakes, having patients look straight up to the ceiling can provide a panoramic view of the retina, facilitating easier laser application.
Determining success or failure
Part of the art of pneumatic retinopexy is determining success or failure as the retina reattaches. Early on in one’s experience with the procedure, there can be a tendency to abandon it prematurely and schedule surgery. One such scenario might be a case with residual inferior fluid, with the offending retinal tear attached and treated. In this case, proceeding to PPV can be problematic, as the inferior fluid would require creating an inferior retinotomy. In this situation, it’s critical to assess the subretinal fluid that remains and determine if it’s getting better or worse.
Search for any open untreated breaks. If the fluid has improved from baseline and has stabilized, then waiting for resorption is preferable. In some cases that can take weeks or months.
On the other hand, it’s important to recognize when the procedure has failed. In the setting of a failed pneumatic retinopexy, undue delay to surgery could lead to worse outcomes. If secondary surgery is performed expeditiously, as several randomized trials have demonstrated, a failed pneumatic retinopexy doesn’t jeopardize final re-attachment rates or visual outcomes.
 |
Bottom Line
Although each step of a pneumatic retinopexy is seemingly simple, it’s an art that can be acquired only with experience. Over time, you’ll learn nuances and modifications that will allow you to perform the procedure successfully in a broad range of cases. Although the PIVOT criteria apply to a specific subset of retinal detachments, pneumatic retinopexy can be used in a wide variety of retinal detachment configurations. RS
REFERENCES
1. Hillier RJ, Felfeli T, Berger AR, et al. The Pneumatic Retinopexy vs. Vitrectomy for the management of Primary Rhegmatogenous Retinal Detachment Outcomes Randomized Trial (PIVOT). Ophthalmology. 2019;126:531-539.
2. Yan P, Minaker S, Mandelcorn ED. Laser marking of the meridian of retinal breaks at the ora: A novel technique for pneumatic retinopexy. Ophthalmic Surg Lasers Imaging Retina. 2016;47:570-572.